Introduction #
Vlink is Verbolia internal linking engine, a powerful cloud-based solution to improve internal links between the pages of your website by injecting a linking block in existing pages.
Vlink takes an url in input and will identify the links and anchors to return based on destination urls and rules that have been defined in the Verbolia platform.
More info here.
How does Vlink work? #
Vlink requires:
- the installation of a Javascript snippet in the product pages OR setting up API calls from your server
- the setup in Vlink backoffice to provide destination url’s and create rules
Here is how the script works
- Initialization: the script will query our API which will first verify the quota usage
- The API will process destination url’s and Vlink rules and return a list of optimized links
Configure Vlink in Verbolia Backoffice application #
In the left menu of Vlink, we have 3 submenus:
1. Settings #
Configuration
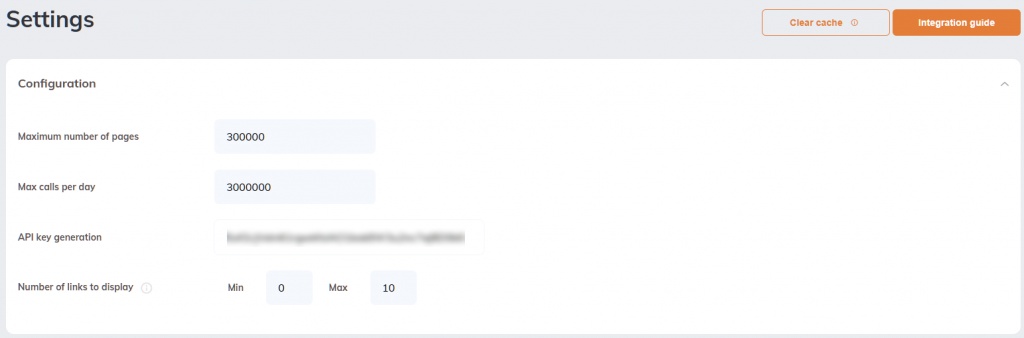
Maximum number of pages: maximum number of pages you can use in submenu ‘Destination URLs’. (can be increased depending on your subscription package. Contact us if you want to add more destination url’s )
Max calls per day: Maximum calls per day. (can be increased depending on your subscription package. Contact us if you want to increase the max calls per day)
Api key generation: Api key used for your account (for client side integrations, the api is already set in the javascript you will add to your page. In this case, it is just displayed for information purposes.)
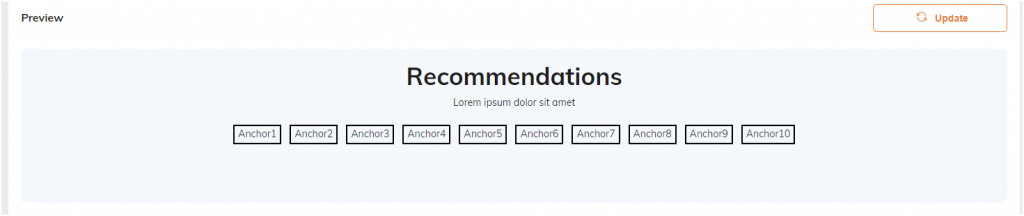
Number of links to display: Choose the amount of links that will be displayed in the linking block.
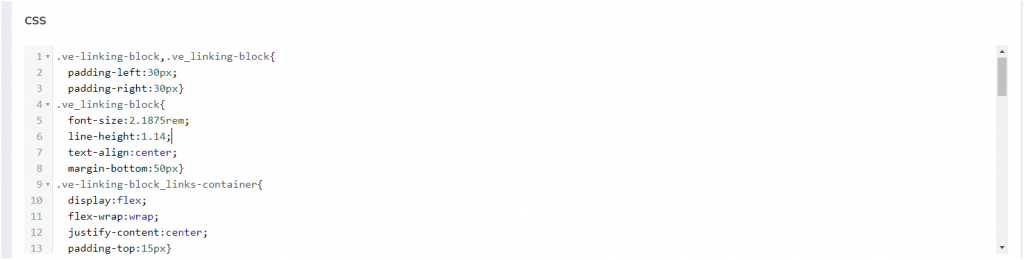
Linking block design (relevant for client side integration only)

Here you can define class names stored in your css and you can set class names you will define in the block below CSS.
Section title will be the title of your linking block and Links text will be the text under the title.
On the right side, you will see which Html tags will use the class names.
CSS : if you don’t use the classes defined in your css , you can create all the css you need to display the links.
Preview : you will see how links are rendered. However, if you are using css from your page, you will not see the correct design here.
Linking block position
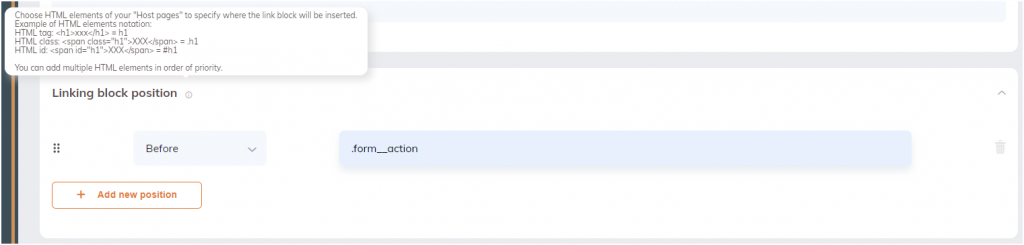
Here you can define where your linking block will be injected on your page.
First dropdown gives the possibility to add the links block after, before or inside the tag selected on your page.
Choose HTML elements of your « Host pages » to specify where the link block will be inserted.
Example of HTML elements notation
HTML tag: <h1>xxx</h1> = h1
HTML class: <span class= “h1“>XXX</span> = .h1
HTML id: <span id=“h1“XXX</span> = #h1
You can add multiple HTML elements in order of priority.
Host Page Custom parameter

By default, our api will send you the H1, meta title and the url of your page. If you want to send other information from your page, you can create a new parameter like for example
Color => document.querySelector(‘input[name=color]’)!=null?document.querySelector(‘input[name=HtmlBlockClass]’).value:null
The new parameter color will be available in the submenu Rules.
2. Destination URLs #
On this page, you can manage the destination URLs that will be inserted in your website’s linking block, and view metrics on how frequently each URL is served. You can :
- Import a list of destination URLs
- Export your list of destination URLs
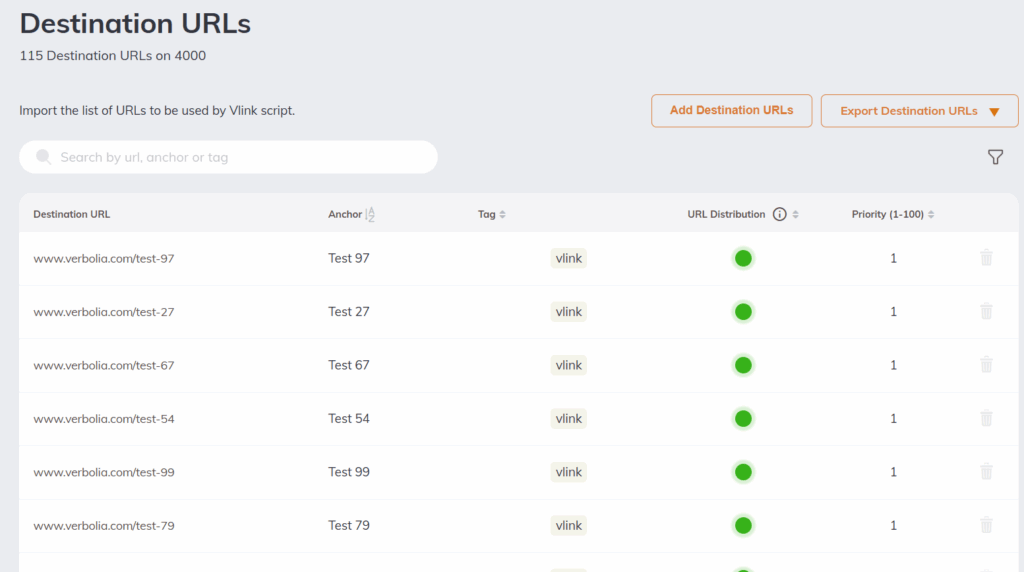
Your import file must include the following mandatory column headers:
- Destination URL : url of the page
- Anchor : the anchor of your link
- Tag : will be used by the rules
- Priority (1 -100) : to give a boost for some pages
3. Rules #
The rules screen shows all the rules you have created. In this screen, you can create and reorder rules—ideally placing the most specific ones at the top and the most general ones at the bottom. Vlink evaluates rules from top to bottom. As soon as a rule’s condition matches the host page, Vlink stops and applies that rule—even if no links are returned.
Specifically, on this screen you can:
- Delete rules
- Create new rules
- Edit rules
- Duplicate rules
- Activate rules
- (Re)-order rules
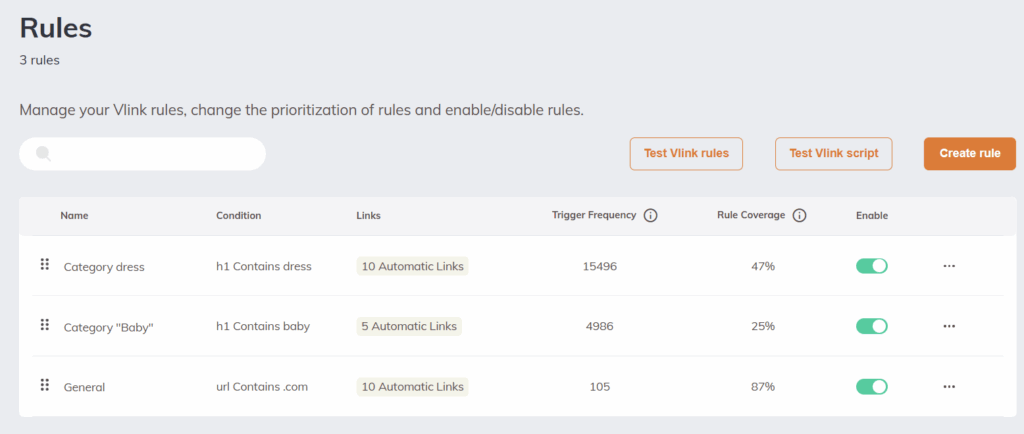
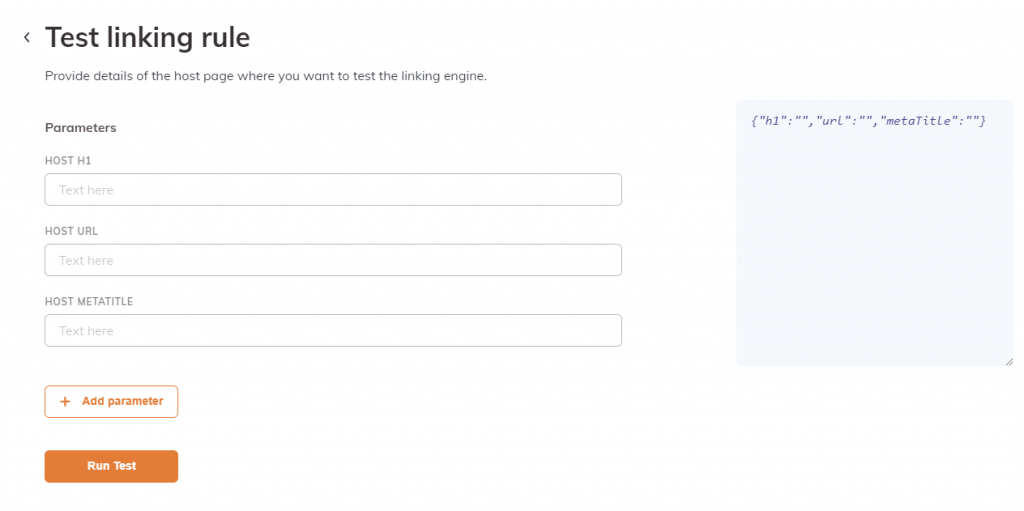
Test linking rules : You will be able to see the linking results for a specific h1, url and metatitle.
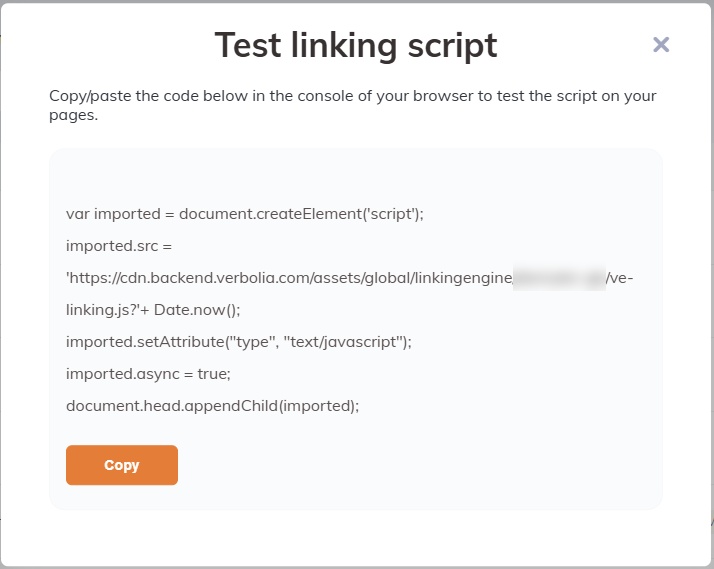
Test linking script : The popup will give you a script to test a specific page. You just need to paste the script in the console of your browser. If a rule matches with the info of your page, you will see the linking block appear on the page.
Create a new rule screen
We have 3 sections :
- Rule name : give a name to the rule.

- Trigger conditions: define the conditions that trigger which host pages links will be added. You can specify rules based on the host page’s H1, URL, meta title or custom parameter to control on which pages the links will be displayed.

- Links selection:
-
- Manual links: You can manually define which URLs and corresponding anchors should be displayed. Manual links are always prioritized first.
- Automatic links: You can define criteria or rules to determine which links should be displayed based on elements of the host page.
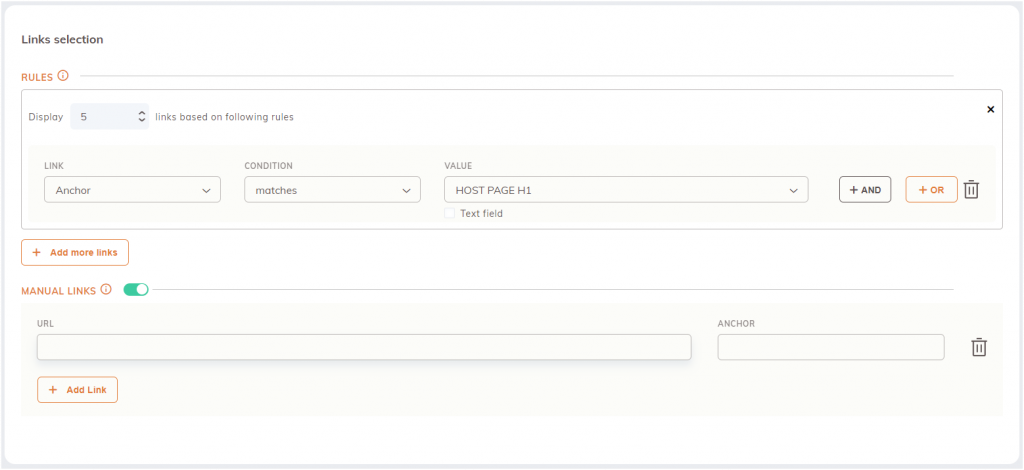
Definition of automatic URL criteria
- First, you need to determine how many URLs you want to display based on each rule criteria block.
- Second, you should define which characteristic of your destination URLs (links) the selection will be based on. You have the following options: Anchor, URL, Tag, and Priority.
- Third, you need to define the conditions under which destination URLs should be selected. There are several options, all designed to help you find the best destination URL match for a host page based on your rules. However, each operates in a different way. Below is a breakdown of the condition operators:
- Matches: Uses a “Match OR” principle i.e., the selected field must at least contain one word from the compare value, rather than requiring all of them to appear (and independently of the case). This has a broader recall but less precision, so results may be less focused, since any of the terms will qualify.
- Contains: The selected field must contain in any place inside of it the compare value (it is an exact match. Same case, space, words). For example, for value “one two three four five six”:
- “one two”,”three four”,”five six” ==> MATCH
- “One two”, “one three”,”one four” ==> NOT MATCH
- Does not contain: It is the opposite of the “Contains” condition. For example, for value “one two three four five six”:
- “One two”, “one three”,”one four” ==> MATCH
- “one two”,”three four”,”five six” ==> NOT MATCH
- Starts with: The selected field must start with the compare value (it is an exact match. Same case, space, words). For example, for value “one two three four five six”:
- “one two”,”one two three four” ==> MATCH
- “One two”, “one three”,”two three” ==> NOT MATCH
- Does not start with: It is the opposite of the “Starts with” condition. For example, for value “one two three four five six”:
- “One two”, “one three”,”two three” ==> MATCH
- “one two”,”one two three four” ==> NOT MATCH
- Ends with: The selected field must end with the compare value (it is an exact match.Same case, space, words). For example, for value “one two three four five six”:
- “five six”,”four five six” ==> MATCH
- “One two”, “one three”,”two three” ==> NOT MATCH
- Does not end with: It is the opposite of the “Ends with” condition. For example, for value “one two three four five six”:
- “One two”, “one three”,”two three” ==> MATCH
- “five six”,”four five six” ==> NOT MATCH
- Equals: There should be an exact match with the search term (same case, space, words). For example, for value “one two three four five six”:
- “one two three four five six” ==> MATCH
- “One two three four five six” or “one, two three” ==> NOT MATCH
- Does not equal: There should NOT be an exact match with the search term. For example, for value “one two three four five six”:
- “One two three four five six” or “one, two three” ==> MATCH
- “one two three four five six” ==> NOT MATCH
- Lower than: Linked to a numeric value
- Lower than or equal to: Linked to a numeric value
- Greater than: Linked to a numeric value
- Greater than or equal to: Linked to a numeric value
- In list: It is the same as the Equals but it can contain multiple values to compare. For example compare field value “one,two,three,four”:
- “one”,”three” ==> MATCH
- “five”, “ONE”,”two,three” ==> NOT MATCH
- Not in list: It is the opposite of the “In list” condition. For example compare field value “one,two,three,four”:
- “five”, “ONE”,”two,three” ==> MATCH
- “one”,”three” ==> NOT MATCH
- Finally, you need to define a host page value against which the destination URL characteristics will be compared and matched. Possible options include the host page H1, host page URL, host page meta title, or any other host page parameter defined in Vlink settings. Alternatively, you can specify a custom value using the text field.
How automatic destination URLs are selected for display on your host pages
As mentioned above, you determine which automatic destination URLs are displayed on your host pages by defining rules.
When a visitor lands on one of your host pages, the Vlink API is called to check whether a rule’s trigger condition is met (e.g., the host page H1 contains ‘test’) and to request a set of destination URLs.
Here is an example of what an API request contains:

When the trigger conditions are valid, the rule is executed. If there are not enough URLs, Vlink proceeds to the next rule, provided that rule’s conditions are also valid.
If a rule is valid and executed, manual URLs are always selected first. Vlink then requests the automatic destination URLs from our database, which enables fast, near real-time storage, search, and analysis.
Depending on your data, you might have a large number of destination URLs that meet a certain condition, while the host page only requires a small number (e.g., 10). To display the exact number of destination URLs defined in your rules, our smart database selects the URLs by applying special formulas based on the following parameters:
- Random score: A random number assigned by our system, ensuring a fair distribution of destination URLs.
- Priority score: The priority score you assign to each destination URL, ranging from 1 (lowest) to 100 (highest). This ensures higher-priority URLs are favored.
- Relevancy score: A number that represents how well a search term matches the search query (compare value) relative to others. This ensures the results remain relevant.
All three parameters play an important role in ensuring that:
- Destination URLs are distributed evenly.
- Destination URLs displayed are relevant to your host page.
- Higher-priority destination URLs are favored over lower-priority ones, without completely dismissing the latter.
Integrate Vlink script into your pages #
There are 2 ways to add the Vlink widget to your pages.
- server side integration
- client side integration
1. How to use the api server side #
Endpoint
- Api URL : https://linkingengine.prod.backend.verbolia.com/linkingengine/getlinkings
- Method : GET
Parameters
Headers
- Content-Type: application/json
- x-api-key: ***************************************
- Origin: https://yourhostname.tld
URL query parameters
https://linkingengine.prod.backend.verbolia.com/linkingengine/getlinkings/[WebsiteName]/[WebsiteCulture]?metatitle=[metaTitle of the host page]&url=[DOMAIN URL]&h1=[H1 of the host page]
You may find the url query parameters in:
- Configuration > Settings : (DOMAIN URL)
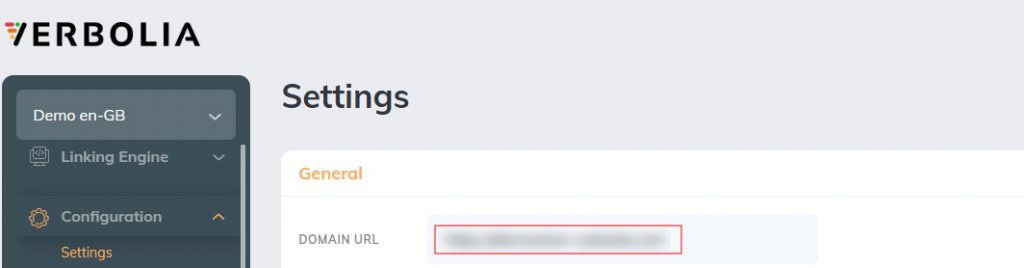
- Dropdown of the main menu: (WebsiteName and WebsiteCulture)

IMPORTANT: all values in the querystring must be encoded using encodeURIComponent (javascript function). You can use this tool to manually encode links for testing purposes.
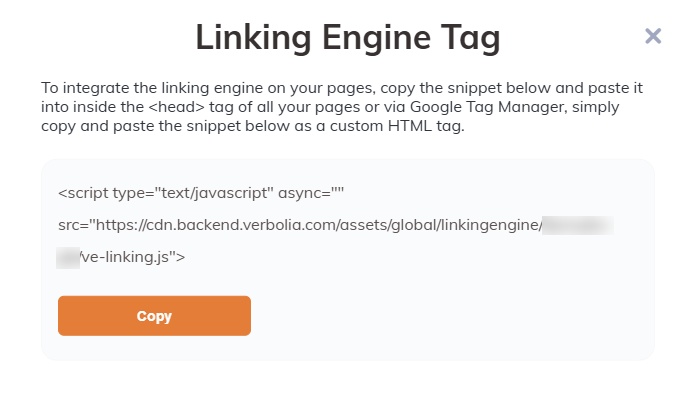
2. How to integrate client side #
On the Vlink settings page, you will see an integration guide button on the top right. When clicking, a popup will appear that provides the javascript you need to inject in your pages where you want to see the links.