
What is a reverse proxy #
A reverse proxy is a server that acts as an intermediary, sitting in front of one or more web servers to intercept user requests before they reach their intended destination. It then routes these requests to the appropriate backend server and returns the server’s response to the user.
A reverse proxy configuration is a required step for working with Vpage.
Why a reverse proxy matters for Vpage
A reverse proxy is a crucial technical component for Vpage, as it allows pages to appear on your domain name. This is essential for two key reasons:
- Trust and authority: By keeping the user on your trusted domain, you benefit from its established authority and brand recognition. This can improve user confidence and potentially boost your search engine ranking.
- Seamless user experience: The user’s journey is uninterrupted, as they stay on a familiar URL, creating a smoother and more professional experience.
Technical Overview #
Notes: Always replace www.client.xxx, with your hostname, client.backend.verbolia.com with the given verbolia hostname and /path_to_verbolia/ with the agreed routed path.
First, it is necessary to define a specific URL pattern. Any requests sent to URLs that match this pattern, such as https://www.client.com/path_to_verbolia/, must be reverse proxied to the Verbolia servers.
The reverse proxy should route these requests to the corresponding Verbolia endpoint, in this example, https://client.backend.verbolia.com/path_to_verbolia/.
Depending on your infrastructure the reverse proxy configuration can be “per website” (here under Single Website and Splitted infrastructure) or shared between multiple instances (Consolidated infrastructure).
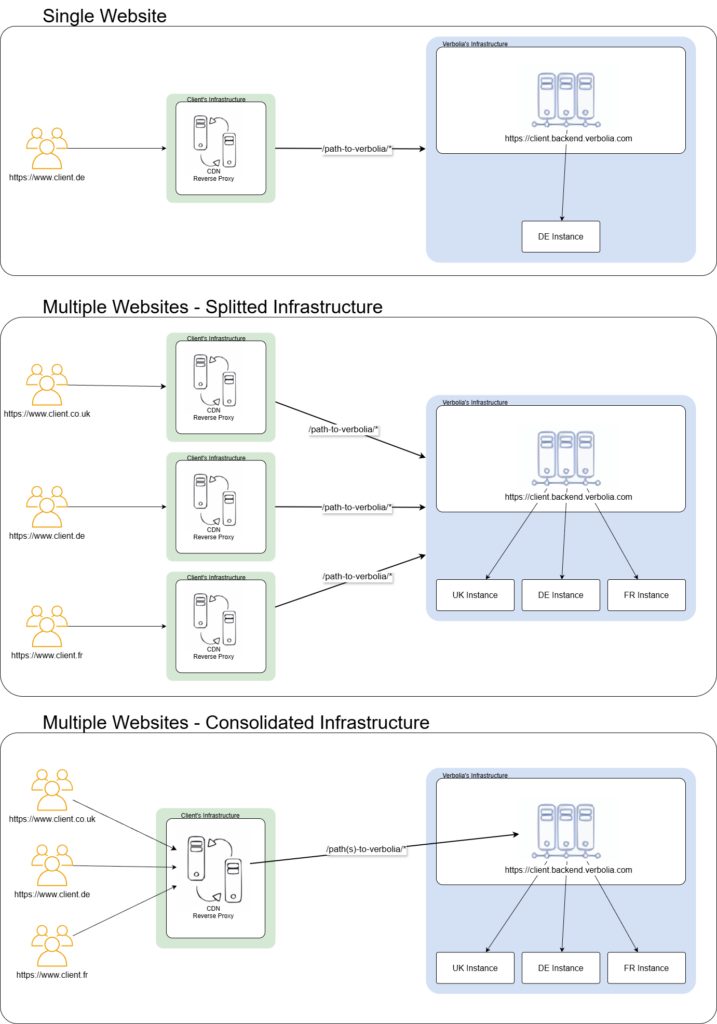
Both “Single Website” and “Splitted infrastructure” require a separate CDN/Reverse Proxy configuration, while a “Consolidated infrastructure” can benefit from a single managed CDN/Reverse Proxy configuration to route all Websites to the appropriate attached child instances’ backends via the master backend.
In all scenarios, the CDN/reverse proxy must:
- Send the request to the backend using the backend’s hostname client.backend.verbolia.com
- Add the header X-Forwarded-Host with the original host www.client.com
- Preserve the full path /path_to_verbolia/*
- Forward original User-agent header
- Forward original url parameters (querystring)
- Do not modify the x-robots-tag header received by our servers
How does it work?
Our servers will receive the request with the following information: Host via the x-forwaded-host, header www.client.com, path /path_to_verbolia and Verbolia endpoint client.backend.verbolia.com.
Verbolia endpoint will point to the dedicated Master backend instance while the x-forwarded-host header and the path will be processed to reach the corresponding attached instance, therefore, it is crucial that this information is fully accurate in the backoffice:
Cloudflare: #
Step 1: Create a worker
A Cloudflare Worker is a serverless execution environment that allows you to run custom code at the “edge” of the internet – directly in data centers closest to your users – to intercept and modify web traffic with near-zero latency.
- Log in to your Cloudflare dashboard and go to your domain.
- In the left navigation menu, click Workers Routes, then select Manage Workers.
- Click the Create application button and select “Start with Hello World!”
- Give the Worker a name I.E. reverse-proxy-verbolia and click Deploy
- On the top right, select Edit code and replace the code with the following one (replace www.client.com and client.backend.verbolia.com values with your hostname and the given verbolia hostname) and click Deploy:
async function handleRequest(request) {
    let url = new URL(request.url)
    const originalHostname = url.hostname

    // Check if the incoming hostname is a key in the ORIGINS object
    let target = ORIGINS[originalHostname]

    if (target) {
      // Change the hostname for the redirection
      url.hostname = target

      // Create a new Headers instance to allow modification
      // since request.headers is immutable
      const newHeaders = new Headers(request.headers)

      // Add a header with the original domain
      newHeaders.set('X-Forwarded-Host', originalHostname)

      // Optional: some backends prefer the target host in the 'Host' header
      // newHeaders.set('Host', target)

      // Return the fetch request with the new headers
      return fetch(url.toString(), {
        method: request.method,
        headers: newHeaders,
        body: request.body,
      })
    }

    // Otherwise, process the request normally
    return fetch(request)
  }

  addEventListener('fetch', event => {
    event.respondWith(handleRequest(event.request))
  })

  const ORIGINS = {
    'www.client.com': 'client.backend.verbolia.com',
  }
Step 2: Create a route
- In the Settings menu, in the Domains & Routes section click +Add
- In the next steps, choose Route then your Domain as Zone and the agreed routed url pattern as Route. Example: www.client.com/path_to_verbolia/*
- Click Add route.
With the Worker deployed and the Route active, any request to www.client.com/path_to_verbolia will be routed to client.backend.verbolia.com/path_to_verbolia while also including the X-Forwarded-Host header with the original hostname.
Apache #
Prerequisites
You’ll need to ensure the necessary Apache modules are enabled. You can do this with the following commands on Debian/Ubuntu-based systems:
- mod_proxy: The main proxy module.
- mod_proxy_http: For HTTP connections.
- mod_headers: To manipulate request headers.
sudo a2enmod proxy proxy_http headers ssl
sudo systemctl restart apache2
Apache Configuration
Edit your virtual host configuration file (usually located at /etc/apache2/sites-available/) and reload Apache. The complete VirtualHost block below handles the routing and manages the headers.
ServerName www.client.com
# ... other configuration for the default location ...

# Add the header X-Forwarded-Host with the original host (www.client.com)
RequestHeader set X-Forwarded-Host "%{Host}i"

# Send the request to the backend using the backend’s hostname (client.backend.verbolia.com)
ProxyPass /path_to_verbolia/ https://backend.verbolia.com/path_to_verbolia/
ProxyPassReverse /path_to_verbolia/ https://backend.verbolia.com/path_to_verbolia/

# Activate SSL Proxy engine
SSLProxyEngine On
With these rules active, any request to www.client.com/path_to_verbolia will be routed to client.backend.verbolia.com/path_to_verbolia while also including the X-Forwarded-Host header with the original hostname.
Cloudfront #
Step 1: Create the Origin
First, define your backend server as a new origin for your CloudFront distribution.
- In your CloudFront distribution’s management console, go to the Origins tab.
- Click Create Origin.
- For Origin domain, enter client.backend.verbolia.com.
- For the Name, a unique name will be generated automatically, or you can set a custom one like verbolia-client-origin.
- Set the Protocol to HTTPS only.
- Add the custom header X-Forwarded-Host and set it to client.backend.verbolia.com value.
Step 2: Create the Origin Request Policy
This policy is where you’ll configure the headers that CloudFront forwards to your backend. It’s crucial for the X-Forwarded-Host header.
- Go to Policies, then select Origin Request.
- Click Create origin request policy.
- Give the policy a name, for example, VerboliaHostHeaders.
- Under Origin request settings, choose Include the following headers.
- From the dropdown menus, add the following headers to the list:
– Host
– Referer - Add the X-Forwarded-Host and User-Agent headers by clicking Add custom header.
- Click Create.
Step 3: Create the Behavior
This final step ties the path pattern, the origin, and the policies together.
- Go to the Behaviors tab and click Create Behavior.
- For Path pattern, enter /path_to_verbolia/* to include all sub-paths.
- For Origin and origin groups, select the custom origin you created in Step 1.
- For Cache policy, select CachingDisabled.
- For Origin request policy, select the policy you created in Step 3.
- Click Create behavior.
Your CloudFront distribution is now fully configured to route requests for /path_to_verbolia/* to Verbolia’s Vpage backend, while also including the X-Forwarded-Host header with the original hostname
Akamai #
Please note that this reverse proxy setup has not been fully verified. We strongly recommend testing it first in a safe, non-production environment. If you encounter any issues or need assistance, we encourage you to reach out to our Customer Success team, who will be happy to support you.
The procedure involves creating a property for your domain, then adding a specific rule for the /path_to_verbolia to handle the origin and header behaviors.
Setp 1: Create a New Property
- Log in to the Akamai interface (Luna Control Center).
- Navigate to Property Manager.
- Click Add a new property.
- Follow the prompts to create a property for your hostname (www.client.com).
Step 2: Configure the Rules
Once the property is created, you will arrive at the rule configuration screen.
- Add a new rule by clicking Add Rule.
- Choose Match on Path and enter path_to_verbolia/* in the Path field.
- Inside this new rule, click Add Behavior to define the origin and headers.
Step 3: Add the Origin Behavior
This behavior tells Akamai where to send requests that match the rule.
- Inside the rule you just created, click Add Behavior.
- Select the Origin Hostname behavior.
- Configure it with the following parameters:
– Hostname: client.backend.verbolia.com
– Protocol: HTTPS
– Forward Host Header: Origin Hostname
Step 4: Add the Header Behavior
This behavior is used to add the X-Forwarded-Host header.
- Inside the same rule, click Add Behavior again.
- Select the Modify Outgoing Request Header behavior.
- Configure the settings:
– Action: Add
– Header Name: X-Forwarded-Host
– Value: {{http.request.header.host}} - Ensure the header is set for all requests that pass through this rule.
Step 5: Finalize and Activate the Configuration
- Save the configuration.
- Validate your configuration to ensure there are no errors.
- Activate the property on the production servers.
With this configuration, Akamai will forward requests for /path_to_verbolia/ to Verbolia’s Vpage backend, while adding the X-Forwarded-Host header.
F5 #
Here is how to connect Verbolia pages to your F5 application.
pool verbolia_pool {
  verbolia client.backend.verbolia.com:443
}
…
when HTTP_REQUEST {
  if { ( [HTTP::host] eq "www.client.com" and [HTTP::uri] starts_with "/path_to_verbolia/" ) } {
  # Add the header X-Forwarded-Host with the original host (www.client.com)
  HTTP::header insert "X-Forwarded-Host" [HTTP::host]
  # Rewrite Host header sent to the backend
  HTTP::header replace Host "client.backend.verbolia.com"
  pool verbolia_pool
  }
}
Nginx #
To configure this, you need to add a location block inside your server’s configuration file (usually located in /etc/nginx/sites-available/).
- Open the configuration file for your domain (www.client.com).
- Add the following location block inside the server block.
server {
    listen 80;
    server_name www.client.com;
    # ... other configuration for the default location ...

    location /path_to_verbolia/ {
    # Sets the Host header to the backend's hostname
    proxy_set_header Host client.backend.verbolia.com;

    # Adds the X-Forwarded-Host header with the original hostname
    proxy_set_header X-Forwarded-Host $host;

    # Routes the request to the backend
    proxy_pass https://client.backend.verbolia.com/path_to_verbolia/;

    # Prevent nginx from caching the backend ip address
    resolver 1.1.1.1 ipv6=off valid=3600s;
    }
}
HAProxy #
HAProxy’s configuration is divided into frontend and backend sections. The frontend receives client requests and uses Access Control Lists (ACLs) to route them to the appropriate backend, which defines your destination servers.
Prerequisites
- HAProxy 1.6+
Procedure
- Open your HAProxy configuration file (e.g., /etc/haproxy/haproxy.cfg).
- Add resolvers for dynamic DNS resolution in the default section
- Add a backend block to define your destination server. This is where you set the correct Host header.
- Next, add a frontend block to handle incoming requests from clients. This is where you perform the path-based routing and add the X-Forwarded-Host header.
defaults
    resolvers publicdns
    nameserver cloudflare 1.1.1.1:53
    nameserver google 8.8.8.8:53
    hold valid 300s
backend verbolia
    mode http
    option forwardfor
    server srv_verbolia client.backend.verbolia.com:443 ssl verify none
    http-request set-header Host client.backend.verbolia.com
    resolve-prefer ipv4 resolvers publicdns
frontend main
    mode http
    bind *:80
    bind *:443 ssl crt /etc/haproxy/ssl/certificate.pem
    # ACL to match the URI path
    acl is_path path_beg /path_to_verbolia/

    # Use this backend for requests matching the ACL
    use_backend verbolia if is_path

    # Add the X-Forwarded-Host header
    http-request set-header X-Forwarded-Host %[hdr(host)]
Fastly #
Fastly uses VCL (Varnish Configuration Language) to control its behavior, but many common tasks, like this one, can be accomplished through the web interface without writing custom VCL code.
Step 1: Create the Backend
First, you need to define your backend server in Fastly.
- Log in to your Fastly account and select your service.
- Go to the Hosts & Backends section.
- Click Create Host to add your backend server.
- For Name, enter a unique name like verbolia.
- For Address, enter client.backend.verbolia.com.
- Set Port to 443 and enable SSL.
- Save the backend.
Step 2: Create the Request Setting
This is a powerful feature that allows you to override request behaviors based on specific conditions. This is where you will define the header manipulation.
- Go to Settings > Request Settings.
- Click Create Request Setting.
- Give it a name, for example, Proxy_Verbolia.
- In the Host Header field, enter client.backend.verbolia.com. This tells Fastly to replace the Host header with the backend’s hostname.
- Under Custom Headers, click Add Header.
- For the Header field, enter X-Forwarded-Host.
- For the Value, enter the VCL variable for the original hostname: req.http.Host.
- Save the request setting.
Step 3: Add a Condition to the Request Setting
This condition ensures that the Request Setting is only applied to requests for the specific path.
- Under your new request setting, click Attach a condition.
- Select Create a new condition.
- For Name, enter a descriptive name like is_verbolia_path.
- For the Apply if field, enter the following VCL logic: req.url ~ “^/path_to_verbolia/”. This condition will be true for all URLs starting with /path_to_verbolia/.
- Save the condition.
Setp 4: Activate the Configuration
Finally, you need to activate your changes to deploy them across the Fastly network.
- Go to the main dashboard for your service.
- Review your changes in the Changes summary.
- Click Activate to deploy the new configuration.
Your Fastly service will now correctly route requests for /path_to_verbolia/ to your backend, setting the Host and X-Forwarded-Host headers as required.
Salesforce #
Requirements
Store environment should have a domain assigned because of URL resolving. In most cases
sandboxes don’t have domain name assigned, but production, development or staging env do.
Based on this, the storefront URL of your store needs to look something like this:
https://example.com or https://sub.example.com.
In case there is no domain assigned, then please read the next section. If a domain is assigned, you can go directly to the Code setup.
- Setting up Aliases for Sandbox
Aliases for sandbox can be set depending on sandbox type. For on demand sandbox you can consult Commerce Cloud Documentation. For older sandboxes you can find IP of your sandbox, add it to the hosts file and then set up aliases JSON like the example below:{
"__version": "1",
"settings": {
"http-host": "dev01.yourhost.demandware.net",
"https-host": "dev01.yourhost.demandware.net"
},
"dev01-eu01-yourhost.demandware.net": [
{"host": "dev01.yourhost.demandware.net"}
],
"dev01.yourhost.demandware.net": [
{
"entry-point-pipelines": ["Home-Show", "Default-Start"],
"entry-point-destination": ["site-path"]
}
]
}
Aliases can be set in the Business manager section Merchant Tools/SEO/Aliases.
Code setup
- Repositorium
You can start by cloning the repository from the Bitbucket repo.
https://bitbucket.org/bpfsteam/verbolia-salesforce-plugin - Preferences
To get required settings for the Verbolia cartridge in your Business manager, import sitedata folder. In order to set up starting preferences change folder name in sitedata/sites/YOUR_SITE_ID to real site id.
Compress the sitedata folder to zip and import it in Business manager Administration/Site Development/Site Import & Export. You can also import just metadata and set up all other things manually by checking the setup image.
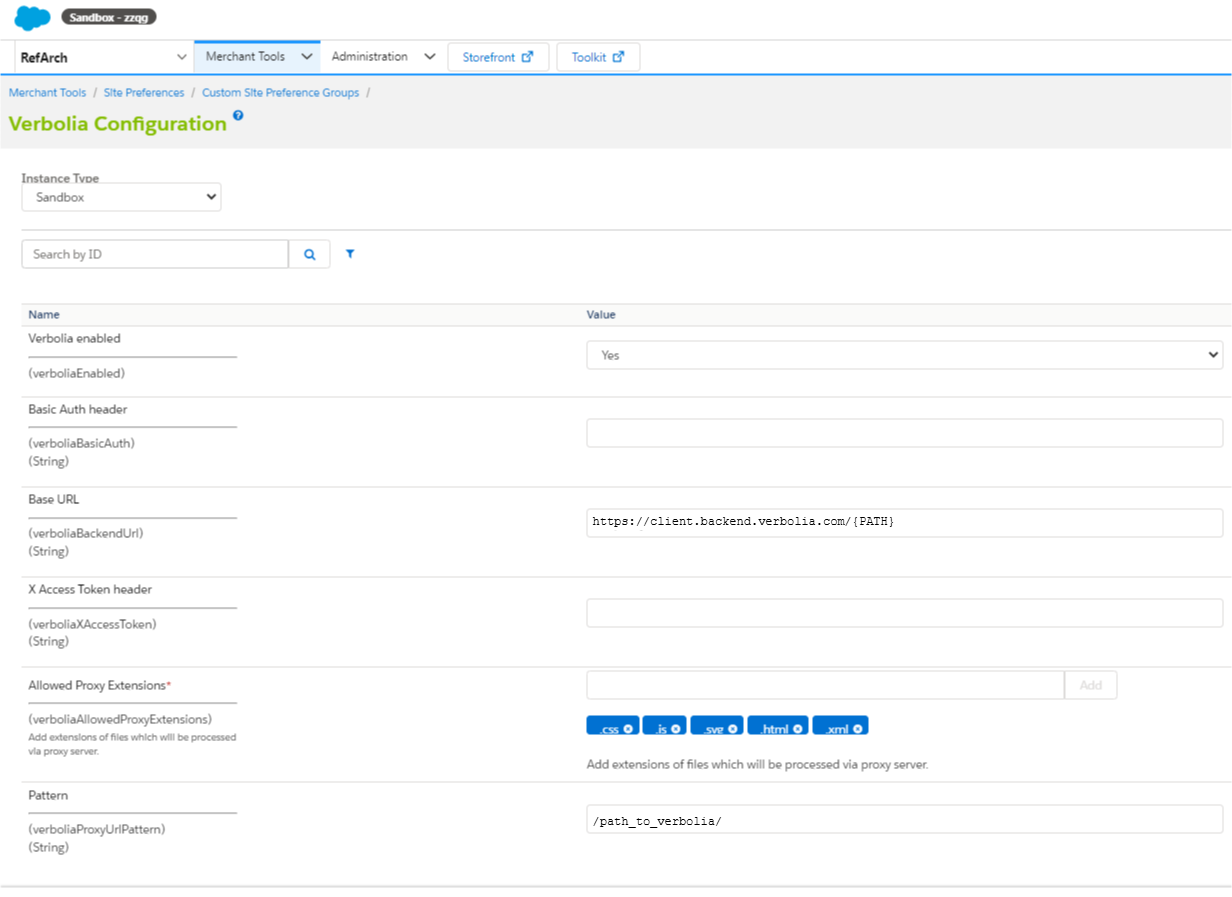
When everything is imported setup Verbolia config in the preferences section. Go to Merchant Tools/Custom preferences/Verbolia Configs preferences group set Base URL, Pattern and Allowed Proxy Extensions.
Parameters should look similar to the following image:
- Parameters
● Base URL – It will looks like https://client.backend.verbolia.com/{PATH}. {PATH} are placeholder variables in the url.
{PATH} is mandatory. It will be used to append path from the SFCC site to the Verbolia base path and perform proxy action against newly constructed URL.
● Pattern – Most important thing is to define the correct pattern in order to trigger unknown urls to be proxied to Verbolia. Based on the patter code will know which URL needs to be processed and sent to Verbolia (E.G.: /path_to_verbolia/)
● Allowed Proxy Extensions – Allowed extensions will be fetched by the SFCC http call and all others will be redirected to the Verbolia with 302 status. This means that images will be just performed as redirect to Verbolia and printed directly from their server and JS, HTML etc. will be requested by the code from their server and printed in the SFCC. This is mainly because binary files shouldn’t be fetched by http but printed directly. - Cartridge setup
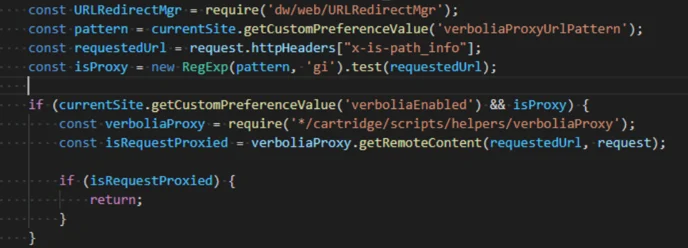
Cartridge app_verbolia has to be the first cartridge in the cartridge path in order to override the RedirectUrl-Start route correctly. - SFRA
For the SFRA architecture we don’t have to do anything besides the setup defined above. - SiteGenesis
For SG approach code has to be merged with the RedirectUrl-Start route. It has to be on top of the route in order to prevent other code from executing when the route is matched with a pattern from the Verbolia Config.
- How to test
For testing if the route works properly you just have to hit the url with the correct pattern.
Example
If setup is like:
● Site url: dev01.verbolia.demandware.net
● Pattern: /path_to_verbolia/
When user lands on any page that looks like: https://dev01.verbolia.demandware.net/path_to_verbolia/some-valid-path
It will trigger proxy behavior and fetch content from the remote Verbolia server. If you get 404 pages it means that something is not set correctly or code is not properly placed in your project.
Please refer to the steps above or contact Verbolia for assistance.